Friday, February 6, 2009

ADF 11g : CheckBox Demo (Select one checkbox in table, Select all/Deselect all)

Note : This post is incomplete and still under progress ....

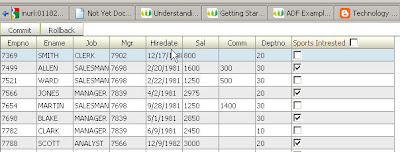
If you are a regular user of ADF and the checkbox component you might have already saw the Steve Muench's demo app of creating a checkbox in table in 10.1.3 (117. Editable Checkbox in an ADF Faces Table [10.1.3.2] 19-JUN-07). Here you'll see creating the same kind of demo application with checkbox as one of the table column.One more added feature you will see here is the Select all /Deselect all checkbox on the column header.
Components : JDev 11g production verion available at otn for free download.
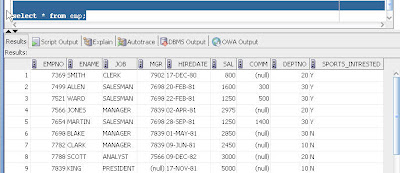
Oracle XE Free database with a schema with EMP table.
Add the Sports_Intrested (Varchar2(1)) column to the EMP table which we will be using to show the check box in the ui.

Sports intrested column is a varchar2(1) column which stores the values 'Y' or 'N' depending
upon a Employee is intrested in sports or not.

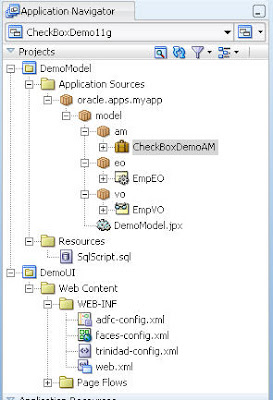
Create a EmpEO ,EmpVO and a CheckBoxDemoAM using the EMP table.
leave the attributes to their default types.SportsIntrested Attribute will be a String Attribute.

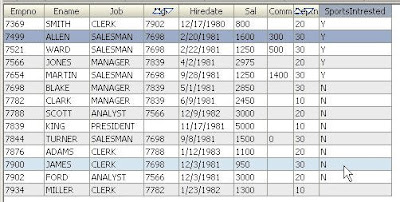
Create a Test page and drop the Emp VO instance under the CheckBoxDemoAM on the test page to create a ADF faces table.


This would render the column SportsIntrested as a simple Output text column showing the Y or N values.
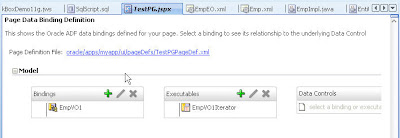
And the TestPG will only have singe tree binding to the Emp1Iterator.
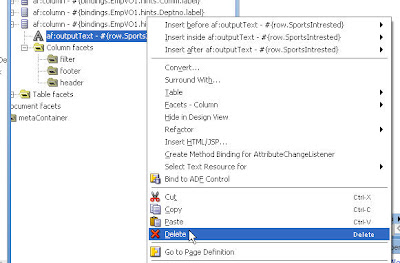
Now delete the sportsIntrested Output text from the SportsIntrested Column.(Leave the column intact , only delete the output text.We need the Column to create the checkbox.)
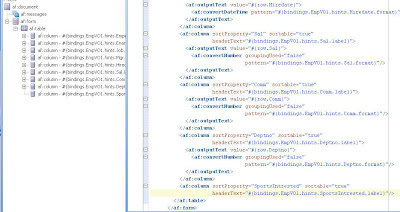

Drop the SportsIntrested attributes on the TestPG in the SportsIntrested Column as a selectOneBooleanCheckbox.
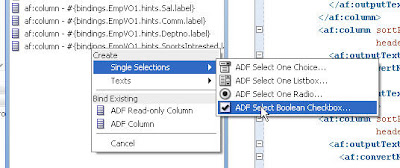
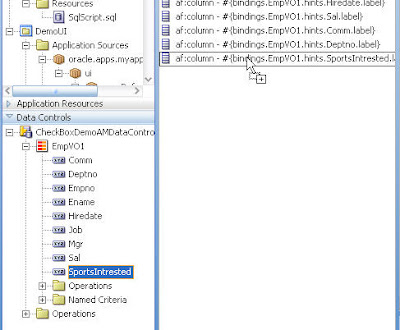


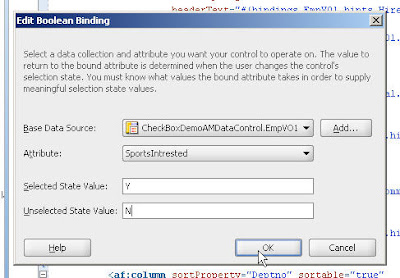
The wizard will ask you for the values which should be mapped to the checkbox when it is checked or unchecked.give the value 'Y' for the selected value and the value 'N' for the unselected.Now do two things.
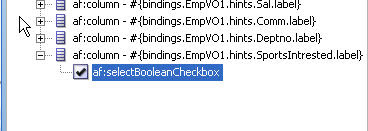
1.set the autosubmit value on the checkbox to true, unless you do this your checkbox value is not submitted.
2.give a value to the id property of the checkbox and set it as one of the partial trigger to the af table.


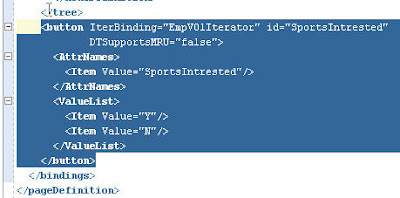
The newly created checkbox will create a button binding to map the checkbox check/uncheck condition depending upon the attribute value.
Create the Commit and Rollback buttons which you can always use to test you application from the database.

That's It your 11g checkbox demo is ready!!..
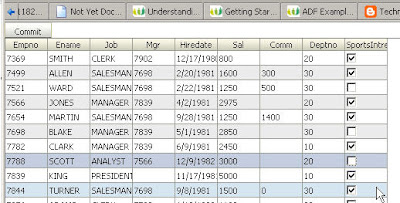


Now we shall add the more intresting feature to the table i.e the select all/deselect all checkbox.

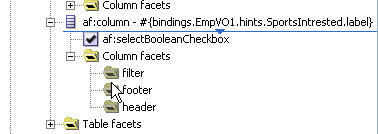
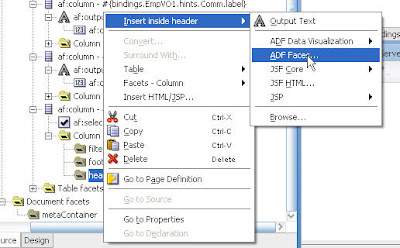
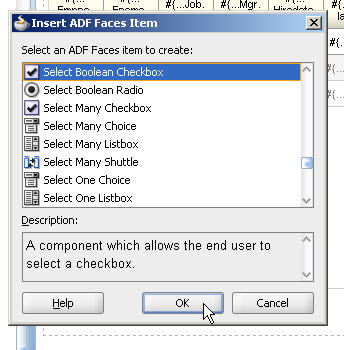
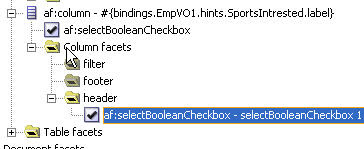


Add a Checkbox to the header facet of the checkbox column.Give it an id say selectAllCheckBox.give it a label say "Select All".

Create a value change listener method to this checkbox by creating a new Managed bean.


Modify the following code and place inside the newly created bean.


public void selectAllCheckBoxVCL(ValueChangeEvent valueChangeEvent) {

System.out.println("xdebug c1 : In selectAllChoiceBoxLN with value = "+
valueChangeEvent.getNewValue());

boolean isSelected = ((Boolean)valueChangeEvent.getNewValue()).booleanValue();
DCBindingContainer dcb = (DCBindingContainer) evaluateEL("#{bindings}");
DCIteratorBinding dciter =dcb.findIteratorBinding("EmpVO1Iterator");

ViewObject vo = dciter.getViewObject();
int i = 0;
Row row = null;
vo.reset();
while (vo.hasNext()) {
if (i == 0)
row = vo.first();
else
row = vo.next();
// System.out.println("Changing row 1: " +
// row.getAttribute("Name"));
System.out.println("xdebug c2: Changing row 2: " +
row.getAttribute("SportsIntrested"));

if(isSelected)
row.setAttribute("SportsIntrested", "Y");
else
row.setAttribute("SportsIntrested", "N");
i++;
}
}

private static Object evaluateEL(String el) {
FacesContext facesContext = FacesContext.getCurrentInstance();
ELContext elContext = facesContext.getELContext();
ExpressionFactory expressionFactory =
facesContext.getApplication().getExpressionFactory();
ValueExpression exp =
expressionFactory.createValueExpression(elContext, el,
Object.class);
return exp.getValue(elContext);
}

One more importing thing is again to set this checkbox autosubmit to true and the af table partial trigger to this checkbox.

Run the TestPG and you'll see the desired results.
Checking the checkbox on the column header level would select all the columns in the table.


Unchecking on the checkbox on the column header level would un check all the columns in the table.

Sunday, February 1, 2009

Using sed with examples

Stream editor in short is called sed is a very powerful command which can do a lot for you when used appropriately.
Here we'll see how it can be used

1.Usage
sed [options] 'instruction[s]' file[s]

2. Print the first line of the file
[bsurnida@localhost ~]$ sed -n '1 p' animals.txt
i hate cats

[bsurnida@localhost ~]$ cat animals.txt
i hate cats
ther is a cat
cat is not here

3.Print selected range of lines from a file
[bsurnida@localhost ~]$ sed -n '1,3 p' animals.txt
i hate cats
ther is a cat
cat is not here

4.Print last line of the file
[bsurnida@localhost ~]$ sed -n '$p' animals.txt
elephant is the biggest animal

5.exclude a set of lines
[bsurnida@localhost ~]$ sed -n '1,3!p' animals.txt
a cat cant exits
here is a black cAT
no he is not taking cat exam

6.print lines containing a word (something like grep)
[bsurnida@localhost ~]$ sed -n '/cat/p' animals.txt
i hate cats
ther is a cat
cat is not here
a cat cant exits

7. Delete the blank lines from the document
[bsurnida@localhost ~]$ sed -e '/^$/d' animals.txt
Option d for delete

8.redirect the output to a new file
bsurnida@localhost ~]$ sed -e '/^$/d' animals.txt > new_animals.txt

9.search and replace using sed
bsurnida@localhost ~]$ sed -ne 's///p'
Option n for silent output , no extra lines in the new file

10.In place editing of a file and file backup
bsurnida@localhost ~]$ sed -i.bak -e 's/3/4' sed1.txt

Extract a word from a file between two words

Many a times its a common requirement to extract a set of words from a file.
Some simple use cases would be like extract a set of jar entries from a build.xml.
If the file is a properly formatted one with proper columns like that of /var/log/messages we can easily extract the word using the awk command,else we have to do a careful use of the grep or egrep commands.

Here is a simple case we want extract a set of words from an xml file ,
Here we extract all the servlets entries from a web.xml file

grep '' web.xml | sed 's//~/' | sed 's/<\/servlet-name>/~/' | cut -d "~" -f2 | sort

The logic used is as follows

1.Find the lines containning the word "" in the fine web.xml (grep '' web.xml)
[bsurnida@localhost ~]$ grep '' web.xml
welcome
ServletErrorPage
IncludedServlet

2.Replace the word "" with a special symbol like ~ using sed (sed 's//~/' ).
[bsurnida@localhost ~]$ grep '' web.xml | sed 's//~/'
~welcome

~ServletErrorPage

~IncludedServlet


3.Replace the word "" with the same special symbo again using sed
[bsurnida@localhost ~]$ grep '' web.xml | sed 's//~/' | sed 's/<\/servlet-name>/~/'
~welcome~
~ServletErrorPage~
~IncludedServlet~

4.Cut the word now between the special symbol using cut ()
[bsurnida@localhost ~]$ grep '' web.xml | sed 's//~/' | sed 's/<\/servlet-name>/~/' | cut -d "~" -f2
welcome
ServletErrorPage
IncludedServlet

5.You can now summarize the result with sort and can use -u for unique values.
[bsurnida@localhost ~]$ grep '' web.xml | sed 's//~/' | sed 's/<\/servlet-name>/~/' | cut -d "~" -f2 | sort
ForwardedServlet
ForwardedServlet
IncludedServlet

Kill a specific program in linux

Particulary while you are in development few program behave weirdly and you wanna kill them anyway.
Generally what ppl does is do a ps or ps aux to list of all the programs then search for the particulary program by looking at the whole list or just by doing at
ps aux | grep 'gedit' (in this case the pgm is gedit) and then they give a ps or if they want a force kill instead of a grace full kill they give
ps -9

Here i give a simple snippet to do the same in one shot
kill `ps aux | grep gedit | grep -v 'grep' | awk '{print $2}'`

The logic is very simple here, we are searching the ps listing (ps aux) for the gedit records (grep gedit) and then remove the 'grep gedit' row (grep -v 'gedit') and then extract the pid (awk '{print $2}') . The final step would be give the extracted pid to the kill command (using the ``).
You may want to use the -9 for a force kill.

An other good option would be to use pkill but the problem with that would be that it would kill all instances of the specified program.
pkill
eg: pkill firefox
You customize the above simple code snippet to find out exactly the one program you want to retreive and kill it.
You can save this as a command if you are using it again and again.

Using AWK with examples

Here we shall look into a one more very powerful command Awk.
Awk is a field processor unlike grep.
Awk supports egrep compatibale regular expressions like possix.

1.The usage of awk would be like this
awk '/optional_match/ { action }' file_name | Pipe

2.To print all the lines of a file
awk '{ print $1 }' animals.txt

[root@localhost bsurnida]# awk '{print}' animals.txt
i hate cats
ther is a cat
cat is not here

[root@localhost bsurnida]# awk '{print $1}' animals.txt
i
ther
cat

Use single quotes with awk, to avoid shell interpretation of awk's variables

3. awk '{ print $1,$2 }' animals.txt
Input and output field separators is whitespace by default

[root@localhost bsurnida]# awk '{print $1,$2}' animals.txt
i hate
ther is
cat is

4. Search for a word in the lines of a file , same like grep
awk '/cat/ { print } ' animals.txt - this will print a lines containing 'cat'
[root@localhost bsurnida]# awk '/cat/ {print}' animals.txt
i hate cats
ther is a cat
cat is not here


5. Search for a particular work in a particular column
awk '{ if ($2 ~ /cat/) print}' animals.txt

[root@localhost bsurnida]# awk '{if($2 ~/cat/) print}' animals.txt
a cat cant exits
[root@localhost bsurnida]#

Use the i and I options to vary the output

[root@localhost bsurnida]# awk '/cat/ {print}' animals.txt
i hate cats
ther is a cat
cat is not here
a cat cant exits
no he is not taking cat exam
[root@localhost bsurnida]# awk '/cat/I {print}' animals.txt
i hate cats
ther is a cat
cat is not here
a cat cant exits
here is a black cAT
no he is not taking cat exam
i am not talking about dogs
[root@localhost bsurnida]# awk '/cat/i {print}' animals.txt
i hate cats
ther is a cat
cat is not here
a cat cant exits
here is a black cAT
no he is not taking cat exam
i am not talking about dogs


6. awk can take input from almost anything like a file,pipe or stdin

awk '{if($5 ~ /dhclient/) print}' /var/log/messages

[root@localhost bsurnida]# cat /var/log/messages | grep dhclient
Feb 1 22:55:42 localhost dhclient: DHCPREQUEST on eth0 to 192.168.59.254 port 67
Feb 1 22:55:42 localhost dhclient: DHCPACK from 192.168.59.254
Feb 1 22:55:42 localhost dhclient: bound to 192.168.59.132 -- renewal in 718 seconds.
Feb 1 23:07:40 localhost dhclient: DHCPREQUEST on eth0 to 192.168.59.254 port 67

[root@localhost bsurnida]# awk '{if($5 ~ /dhclient/) print}' /var/log/messages
Feb 1 22:55:42 localhost dhclient: DHCPREQUEST on eth0 to 192.168.59.254 port 67
Feb 1 22:55:42 localhost dhclient: DHCPACK from 192.168.59.254
Feb 1 22:55:42 localhost dhclient: bound to 192.168.59.132 -- renewal in 718 seconds.
Feb 1 23:07:40 localhost dhclient: DHCPREQUEST on eth0 to 192.168.59.254 port 67

7. Change the input field seperator

[root@localhost bsurnida]# awk '{if($5 ~ /syslogd/) print $3}' /var/log/messages
22:55:04
[root@localhost bsurnida]# awk '{if($5 ~ /syslogd/) print $3}' /var/log/messages | awk -F: '{print $1,$2,$3}'
22 55 04


8.Change the out put field seperator
[root@localhost bsurnida]# date | awk '{print $4}'
23:13:09
[root@localhost bsurnida]# date | awk '{print $4}' | awk -F: 'BEGIN {OFS="-";} {print $1,$2,$3}'
23-14-11